Showing posts with label Life Science. Show all posts

Friday, January 27, 2012

The Animals Have It All Covered – Classifying Animals by Body Coverings

I used to work in a zoo and one of the things that we really tried to teach children was how to recognize the basic types of animals that they see on a regular basis.  I apologize that this isn’t a fun and flashy experiment, but to my way of thinking it is really important for helping children to understand the world around them.  By being able to group organisms together, children can begin to transfer the things they learned from one animal to other similar animals. I've done the following lesson with large groups, small groups, and my own children.

Today we are going to work on the easiest method for children to classify vertebrate (animals with a spinal cord) animals – by their body coverings.  Children as young as two can learn to tell the difference between mammals, birds and reptiles and that is the goal for this lesson, to make the lesson more fun and engaging it helps to have examples of the body coverings to touch and observe.  For our purposes and for the safety of animals, fake furs and scales are preferred as well as domestic feathers.  Better yet if you would like to see the real thing visit a living history museum, zoo, or nature center.
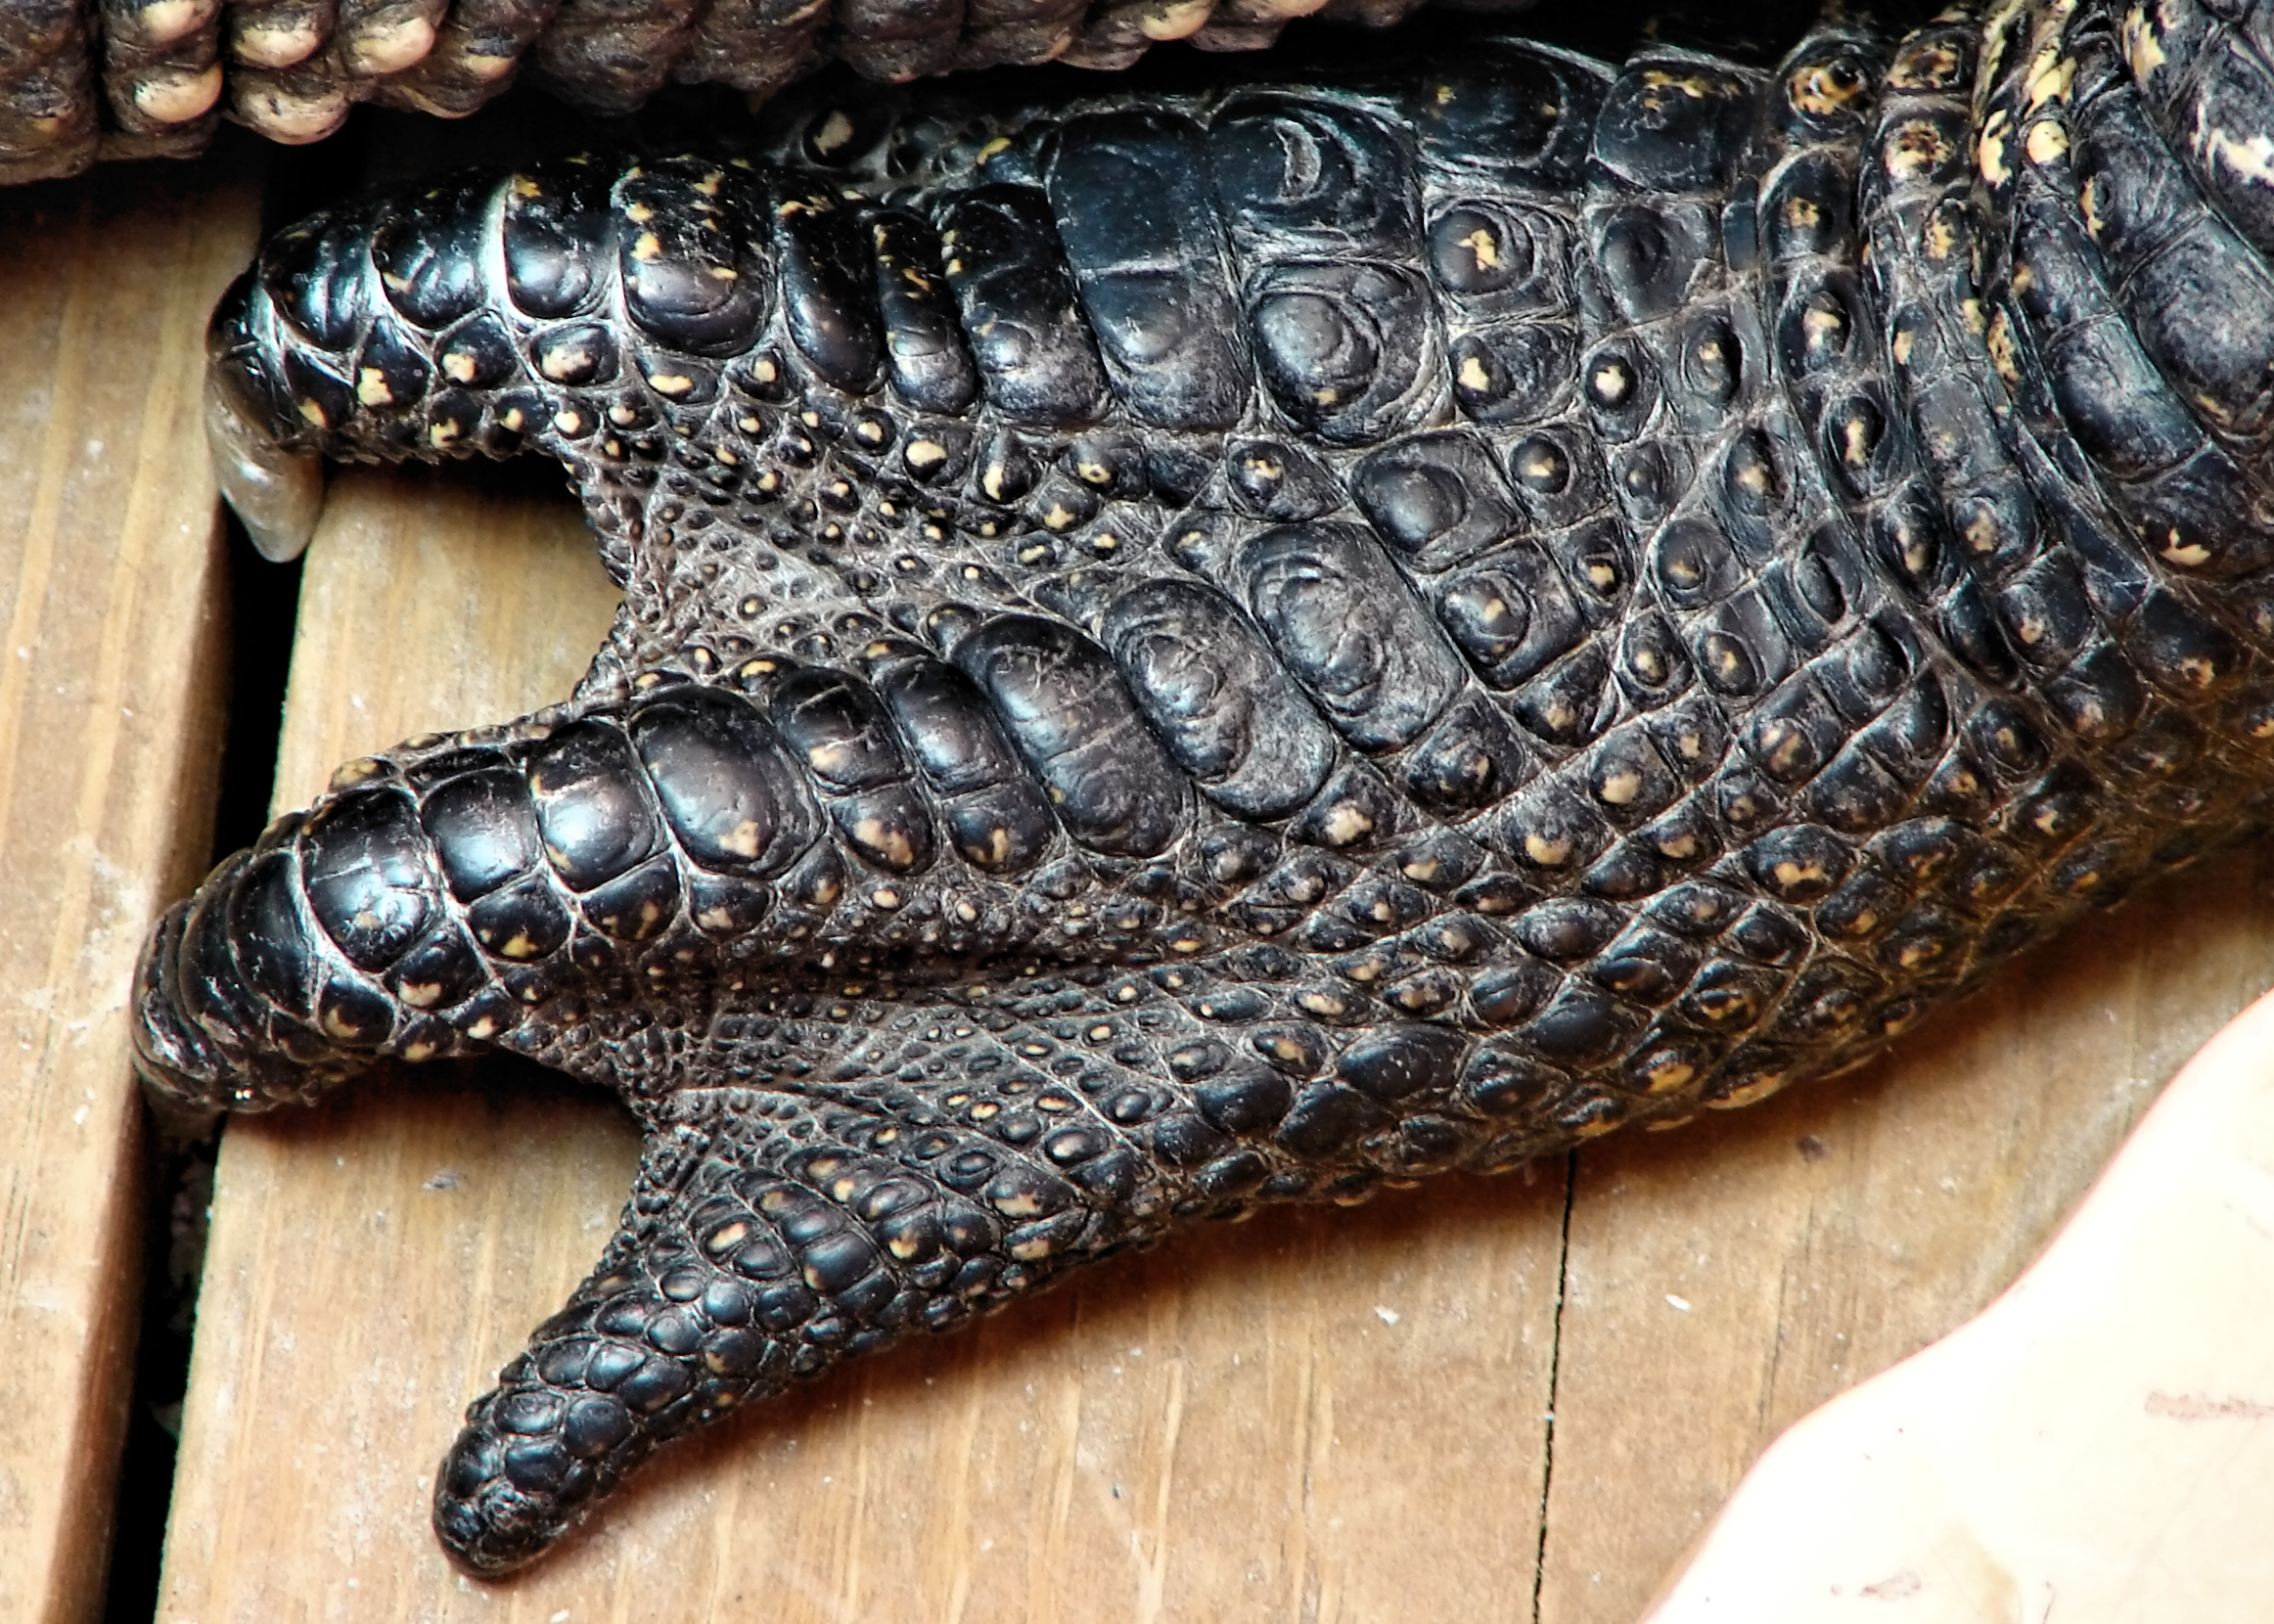
This animal is a reptile because it has scutes. (Alligator)
Photo by Rob from Athens, GA 
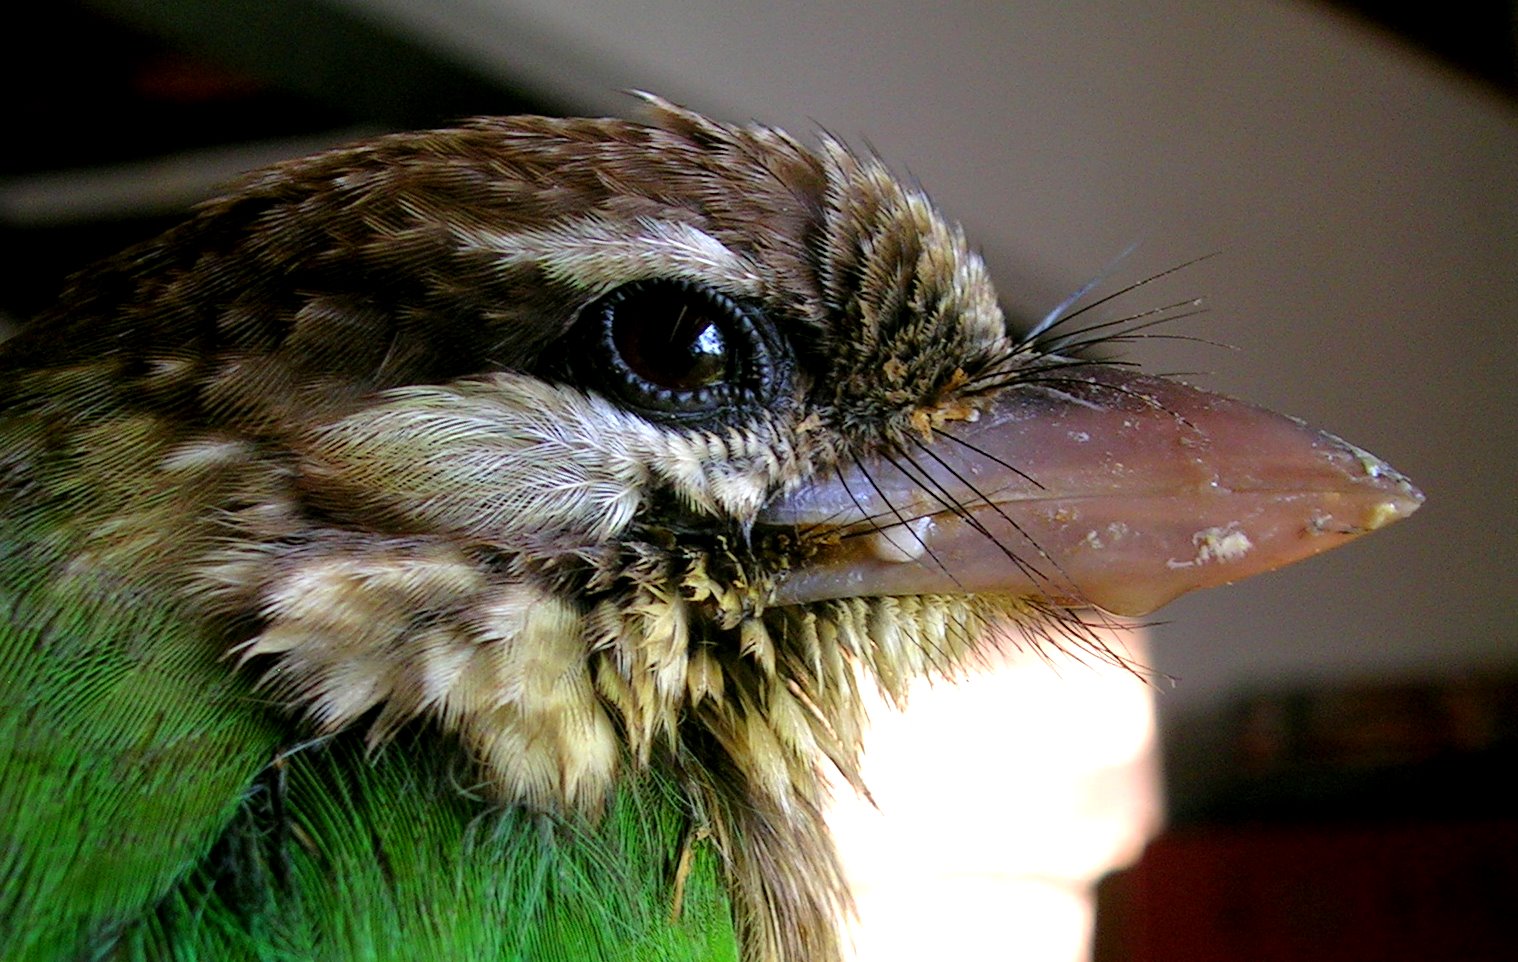
This animal is a bird because it has
feathers (Small Green Barbet) Photo by L. Shyamal


This animal is a mammal because it has hair. 
(Big Eared Townsend Bat.)
Parent Background Guide   Vertebrates (class chordata)  are animals like us.  They are complex, have cells and organs, and have a spinal chord.  The main groups of class chordate are the jawless fishes (lampreys and hagfish), cartilaginous fishes (sharks and rays), bony fishes (all the other ones), amphibians (frogs, salamanders and newts), mammals (animals with fur), birds (animals with feathers), and reptiles (animals with scales or scutes).  Scutes are the boney scales on turtles and crocodilians.   We will be concentration on the 3 land animals in this lesson.  The chart below shows the basics:
This week’s activity
Materials
Realistic toy animals with appropriate body coverings  or
Raid your closet, retail stores, of the local thrift store for items with (preferably fake):
Fur
Feathers
Scales (snake or crocodile skin purse or shoe ??)
A book of animal pictures.

Discovery time: Let your children touch samples of the fur, feathers, and scales.  Ask them to tell you how they feel – bumpy, soft, scratchy, smooth, warm . . . .   This is a great time to  practice using descriptive words.    Have your children contrast how the body covering look different and start practicing the words mammal, bird, and reptile.  Next look at the animal book and let them try to guess which group each appropriate animal fits into.    
Tying it together:  The fun part of this exercise isn’t really during the first teaching lesson, what we loved is looking at books, TV shows, and the zoo and naming each animal as we found it.  Doing this consistently reinforced the ideas for my kids that scales were for reptiles, feathers were for birds, and fur or hair was for mammals.   After we had those things down, we were able to add other facts about each group.  Now whenever, my children see an animal they know something about it even if they don’t know the animals name.  It makes them feel good that they a basic understanding of every animal they see, and makes them want to know even more.  


Friday, January 20, 2012

The Mysterious Couch Potato – Is it an Animal or Plant?

When we our being still and relaxing we call ourselves or our family members “couch potatoes”. But of course people aren’t very much like plants at all, instead we are animals.  In this activity we are going to help children to define the difference between plants and animals.  Having mental classifications for what they see around them helps children to learn more about the natural world.  This week’s  lesson isn’t as active as some.  It is really about observing and chatting with our children about what they see.  Observation and curiosity are really the very most important skills that we can teach our children to encourage them to be scientists.

Parent Background Guide
See the diagram below for the basic characteristics of plants and animals. 


This week’s activity
Materials
Plants vs Animals Worksheet below or https://docs.google.com/open?id=0B81XOd9wgGLVM2ZkNDIyZjEtOWE5MC00MWY5LWJmNzUtZDE5NzljNTZhMDlm
A plant to look at and observe
A living animal to look at and observe

Preparation:   Print the plant and animal comparison worksheet.  I used this first by asking my child to identify the living thing on each line that was different and to tell me why it is different.  This is an open ended thought provoking activity so accept all answers. 

Discovery time: Sit down with your child near both a plant and a living animal.  Ask the following questions giving your children time to answer and discuss what they see: 

Are Plants and Animals the Same?  How do you think they are like each other?  How do they get food?  How do we get more of them?  What if they don’t like where they are sitting anymore – can they move away?

Tying it together:  Pretend Play - One of the best ways to determine if your children understand the differences between plants and animals is to have them act out their knowledge.   I had each of my children pretend to be a plant and an animal.  For the purposes of this experiment, I asked one of them to be a dandelion and the other to be a rabbit.  I asked each one the following questions:

How do you get your food?  (It was fun when the rabbit tried to eat the dandelion.)
What would happen if someone came to eat you??

What happens when you get thirsty??


Germ Farm - Growing microbes from the environment

Two weeks ago we demonstrated how germs move between people when they touch each other and play.  Still, it is very difficult for children to understand that germs can be present even when they do not see them.  In this activity, we will be able to grow the tiny microbes in the environment so that they can be seen with the naked eye.  My children had the opportunity to choose the places that they thought these invisible (to the naked eye) germs might be and then to see how they grew. 

Parent Background Guide
We all know that microbes are all around us.  Some are harmful, but many many more are either beneficial or do not affect us in any way.    The goal of this experiment is to grow some of those microbes.  Most likely we will be growing yeasts and molds whose spores are part of every non-sterile environment.  These are the living things that make leftovers into science experiments in our refrigerators and that cause laundry left wet to long to mildew, but they are also the source of important things like antibiotics, medicines, cheese, and the ever popular beer.
Why potatoes for growing the microbes?  Professional microbiologists make a variety of different types of growth media using potatoes.  In most cases they have cooked or ground the potatoes and combined them with other ingredients.  However, even raw potatoes like we will use in the lab have a high carbohydrate content and are slightly acidic.  This provides a good basis for the growth of fungus, yeasts, and some bacteria infecting plants and plant decomposition.  This is very useful for growing environmental pathogens, but for our purposes it also helps to add a bit of safety because bacteria that would be dangerous to people cannot typically grow on potato based media. 
This week’s activity
Materials
One large potatoe or 2 small ones.
Knife and freshly cleaned cutting board (improve your results by pouring boiling water over the board before you start)
4 clean ziplock plastic bags (not recycled, or use one recycled to see if they really get clean)
A sharpie
Either a dirty house of the courage to look like a bit of a freak rubbing your potato on surfaces in public
Latex gloves (optional, but they improve accuracy)

Preparation:   Rinse the outside of your potato.  Wash your hands carefully.  For the most accurate results sterile your cutting board and wear gloves when cutting the potato.  Probably not necessary, but it’s nice to start with good techniques early.  Slice your potatoes into four pieces maximizing the cut surface area.  Put one potato into each plastic bag and seal. 

Discovery time: Label one bag “control” and explain to your child that you will be leaving that potato alone to see what happens when you try to keep the potato clean.  Let your child help you decide what types of places they would like to test for germs.  We did unwashed hands after school, the dirt outside, a public restroom, the door to a public place, and a toy in a public area.  Label the remaining 3 bags with the item you would like to test.  Have your child wash their hands very carefully and/or wear gloves.  Then help them to rub the open part of the potato on the item they want to test.  Place each slice back in the plastic bag and seal.  Put all bags in a dark warm area (I had mine in a paper bag in the laundry room).  The warmer the area, the faster you will see results and the more likely you will get colonies of bacteria as well as fungus. 
Tying it together:  Keep the potato slices still in their bags without opening them.  If the room is reasonably warm you should see some good growth after one week, in colder areas you might need to wait up to three weeks.  Place the bags next to each other and allow your children to draw conclusions about the dirtiest and cleanest areas they tested.  Help them to understand that the control bag shows what bacteria and fungus are present all around then in the air, in the kitchen, and on the potatoes themselves.  Ask questions like, where was the dirtiest area the potato touched?  What would you want to do after touching that area? 
DISPOSAL:  Seal the bags in a larger plastic or ziplock bag and then throw it away.  Do not open just in case you grew something nasty.


Toys in a public play area. (a little bit of growth)


Doors entering a public area -heavy growth in one area, very little on the rest of the surface.


The Control - very little growth, concentrated where the knife first sliced (I did not sterilize my tools).

A public restroom - lots and lots of yeasts and molds.


Dirt outside our house - very little growth.
Max's hands afterschool.  Growth over most of the potato.


Friday, January 6, 2012

Spreading Germs - A Touchy Subject

It’s wintertime across most of the United States and this is traditionally a time when viruses and bacteria begin to spread more easily and quickly than they do in the summer.  The main reason for this is because we spend more time inside and in closer quarters with others.   Germs go into the air to be breathed in by others when we cough or sneeze, and can settle onto surfaces and survive several hours.  The biggest and best way to prevent colds is handwashing.  We all teach our children to wash their hands, but wouldn’t it be so much easier if we could SHOW them why it is necessary rather than telling them when they don’t want to take time out of playing. 

Parent Background Guide  Around this this time of year I start hearing things like,  “I took my daughter to  . . .  yesterday and now she is sick – we always get sick when we go there.”   As parents we have some misconceptions of how germs spread.  We all know that it is important to keep our children away from others that are sick, however, I feel that sometimes we get so into the idea of this that we forget how germs work once they enter out bodies.  While it is true that some parents bring their children to events sick and contagious or not, it is pretty rare that we can determine where and when exactly our children get sick.  Most germs have a variable incubation period and children are infected two to five days before the first symptoms show up.  Often during that time between infection and symptoms your child is spreading the germs to others.  Before you point fingers remember child may not have gotten sick from that playgroup a few days ago, instead he or she could have been infecting others.  Still getting some colds and infections is unavoidable and being germ-a-phobic doesn’t necessarily bring better health. 

This week’s activity
Materials
Vaseline or Hand Lotion (We used Johnson and Johnsons baby lotion and I think that this lotion was actually not “sticky” enough as the kids were able to replace most of the glitter with dirt when we played so we had to re-glitter them for the handwashing demonstrations.  Still we were able to find glitter “germs” all over our play area.)

Glitter

Several willing friends

Hand Soap

Paper Towels

Hand Mirror

Preparation:  Choose your play area carefully remembering that glitter spreads and can be pretty persistent.  (Have you heard the joke about glitter being the herpes of craft supplies??) 

Discovery time:   Have each child doing the experiment rub hand lotion on the front and backs of one hand.  Choose one child and spread glitter onto his or her palm.  Suggest that the child hold hands with all of his friends and then allow the kids to play for 20 or 30 minutes.  After playing ask each child to see if they have glitter on their hands.  Explain that the glitter is a pretend germ. If your child does not know what germs are, now is a good time to explain.   Also mention that the glitter is not something that can really make them sick, but that there are germs too small to see all over their hands just like the glitter.  If you see glitter on their faces show them with the hand mirror so that they will understand why we tell them not to touch their eyes and mouths with dirty hands.  Next have all of the children try to clean their hands with just a paper towel.  They should find that it doesn’t work very well.  Next try just water and a towel.  Last allow them to use soap and ask the children to wash the whole time they can sing “Happy Birthday” or “Mary has a Little Lamb”  they should find that most of the glitter is gone.  A little bit may remain which is true to what happens in real life.

Tying it together:   Have the children explore the play area looking for glitter.  How did the glitter spread?  Did you give it to each other?  Did you leave it in places that you played so that other people ended up having glitter on them even if you didn’t touch them?  Again remind the children that the best way to get the glitter “germs” and real germs off their hands is by washing your hands with soap for a long enough time.

Fun Facts

• Adults typically have two to five infections annually  and children may have six to ten colds a year (and up to twelve colds a year for school children)

• There are over 200 different “common cold” viruses and each person will typically get each one only once unless it changes as it moves from person to person.  Usually when we say we are “passing” colds from person to person in a family, we are actually getting different colds because our immune system is weakened from the cold we are recovering from.

• Despite the common myth, a dog’s mouth is not actually any cleaner than ours.  There are just as many germs, however there are less germs that can infect a human in a dogs mouth than in ours so if you had to get bitten you would be more likely to get an infection from a human than a dog bite.

 1/5/2012 Compost Update. After about 3 weeks our compost bin was getting pretty full from all the veggies and fruits in our diet. The kids LOVED taking the compost out every day (we kept a coffee can in the kitchen) and stirring up the compost. After we finished adding to it, I kind of fell down on the job of stirring it up regularly. Today, I went out to check and found some good and bad results. First there is no smell whatsoever, so we are going well at keeping good bacteria going. We did have quite the flock of fruit flies but luckily no large bug colony. After reading, it seems like it is a bit wet in there and that I may have added to many greens and need more of the dry stuff. The compost is not appreciably warm to the touch, but is nto as cold as the ground either.  Obviously some of the compost has already broken down because there was more space than before. I added some additional dry leaves from our forested backyard and will be putting some newspaper shreds in as well. Lastly there was quite a bit of fuzzy mold, it didn't look like it would eat me, but it was there. I wasn't sure, but I am told that mold isn't necessarily a bad thing, just part of the breaking down process. I'll update again soon.


Thursday, January 5, 2012

January Preview - Germs and Classifying Living Things

Welcome back to the Preschool Scientist!  We’ve got a whole new year to explore together as our families grow and learn about the world around them.  We have arrived back at a life science month and boy are we going to have fun.  This month we are going to explore two different topics.  The first two lessons are going to be about Germs.  Let’s get our little-ones in the know before the flu and Gastroenteritis (what I like to call the plague and others call the stomach flu) seasons really starts kicking in (at least it hasn’t kicked in here yet, but I am sure it is going around some other places).  The first two weeks will be devoted to germs and then we will be taking a look at the differences between animals and plants and classifying animals into their main groups. 

Materials:  As far as my planning goes these are the materials that you will need.

Week 1:   Spreading Germs -  A Touchy Subject
Hand Lotion
Glitter
Several willing friends
Hand Soap
Paper Towels

Week 2:  Germ Farm

One large potatoe or 2 small ones.
4 plastic bags
A sharpie
Either a dirty house of the courage to look like a bit of a freak rubbing your potato on surfaces in public : )

Week 3:  The Mysterious Couch Potato – Is it an Animal or Plant?
An example plant (preferably living)
An example animal (also preferably living – if you don’t have a pet take a side trip to a zoo, aquarium, or pet store)


Week 4: The Animals have it all Covered – Classifying Animals by body Coverings
Realistic toy animals with appropriate body coverings  or
Raid your closet, retail stores, of the local thrift store for items with (preferably fake):
Fur
Feathers
Scales (snake or crocodile skin purse or shoe ??).


I hope you enjoy what I have in store for you!

Saturday, November 26, 2011

Recycle those leftovers – Composting

My daughter displaying our finished
compost bin.
For a long time, my husband has been lamenting our inability to have a compost heap due to our frequent military moves.  Having been raised by gardeners it is hard for him to throw our leftovers in the garbage (of which we have tons due to picky kids).  When I found this great idea for a stink free and small scale compost bin, I knew we had to give it a try.  Our bin became a fun family project, and it is all set up in our back yard waiting for tonight’s leftovers.  I can’t wait to show the kids how the things that we throw away become nutritious soil for us to use in our garden next year. 

Parent Background
Why Compost?   Did you know that 27% of the solid waste that goes in landfills is compostable items that could be used to make wonderful rich soils that have wonderful benefits for your landscaping and garden.  At the same time that we are throwing away all of these items that we could easily recycle on our own, we are spending money to purchase chemical fertilizers that we just don’t know are truly safe.  Now this backyard composting activity is most certainly not going to remove all 27% of those food scraps and yard waste from the waste stream, but it can give our children a small start to learn how composting works, and to produce some great organic (and free) fertilizer to use around our own homes.  Composting is easy, unpleasant odor-free when done correctly, and it’s even fun to see what can happen to the scraps we do not eat.  This activity can produce a tiny amount of compost for a potted plant in an apartment, or a larger amount for a whole garden depending how big of a container you use.
The Activity – Make your own mini-composting bin. 
Materials
Any plastic bin with a tight fitting lid with a greater than 16 in length.  (We chose a larger-size tote box to allow us to make more soil and because we already had a cracked one ready to be upcycled)

Drill or knife
Brown or Dry materials such as fall leaves, dried grass clippings, shredded newspaper, cut up cardboard, used paper towels, dried flowers.

Wet stuff – weeds that do not have seeds yet(adding weeds that have seeded will just spread weeds to whatever you use the compost on), fresh grass clippings, fruit and vegetable scraps from food preparation or left overs, coffee grounds, tea bags (remove staple), egg shells, plants.

Items to avoid:  Meat, bones, fats, oils, breads, pasta, nuts, glossy paper, and animal or human wastes.  Though some of these items can be composted, it is best to avoid them in small scale composting.
Procedure:
1.        Prepare your composting bin by drilling holes for ventilation and drainage. 
a.       Drill at least 4  ¼”-1/2” holes in the bottom of the plastic bin.  We made holes in each corner and then a couple of smaller ones in the middle for drainage.
b.      Poke holes along the top of the bin at least every 3 inches.  Our holes were about ¼” .  Make a series of 10-12 holes through the lid of the plastic bin also to provide further aeration.  It is recommended to make the holes ¼”-1/2” also.
c.       If you find later that your compost is developing a smell you can add more holes, as a bad odor is usually the result of not enough air getting into the compost.
2.       Place a bottom layer of dry materials filling up about ¼ -1/2 of the bin.
The kids tearing up old newspaper for
the bottom layer of the compost bin.
3.       Layer dry and “wet” items trying to keep the mix from at least 50% dry materials.

4.       Stir or thoroughly shake the compost bin every couple of days for the first month and then every week to two weeks as the compost develops.
5.        After the first two weeks the compost should be warmer than the outside temperature as a result of the process of bacteria breaking down the plant materials in the compost.  If the compost is no longer warm to the touch on the inside, you should add more wet materials and stir it in. 

The kids shaking up the
box of dried materials.
6.       This compost bin can be kept inside depending on the size, but should be exposed to some sunlight and moisture to help the decomposition process.

7.       Within 4- 6 months depending on the temperature where you live, you will have rich soil to put on your spring plantings as well as a number of opportunities for your child to explore and observe nature’s ability to recycle.
Tying it all Together
Dry materials in the compost bin - grasses,
leaves, old newspaper.
Make sure to let your child help you to set up the compost bin.  Stirring the compost together is a wonderful job to allow a toddler or a preschooler to assist with and it will give them a change to see the soil as it changes throughout the winter and to know that they helped to make this wonderful food for their plants next year.  Involving kids in gardening is a wonderful way to help picky eaters learn to eat their vegetables, and making their own soil helps them to start at the “ground” floor and see the whole cycle of how our earth provides the things we eat.   

I look forward to reporting on the progress of our compost bin throughout the year, I hope that you will start your own with your family and swap stories with me.

1/5/2012  Update.  After about 3 weeks our compost bin was getting pretty full from all the veggies and fruits in our diet.  The kids LOVED taking the compost out every day (we kept a coffee can in the kitchen) and stirring up the compost.  After we finished adding to it, I kind of fell down on the job of stirring it up regularly.  Today, I went out to check and found some good and bad results.  First there is no smell whatsoever, so we are going well at keeping good bacteria going.  We did have quite the flock of fruit flies but luckily no large bug colony.  After reading, it seems like it is a bit wet in there and that I may have added to many greens and need more of the dry stuff.  Obviously some of the compost has already broken down because there was more space than before.  I added some additional dry leaves from our forested backyard and will be putting some newspaper shreds in as well.  Lastly there was quite a bit of fuzzy mold, it didn't look like it would eat me, but it was there.  I wasn't sure, but I am told that mold isn't neccessarily a bad thing, just part of the breaking down process.  I'll update again soon.

Toddler Tuesday: Wax Paper Leaves

Today I am going to recommend that you do a classic leaf activity that your toddler can use to help decorate for Thanksgiving.  Wax paper leaves!  Do you remember ironing wax paper to preserve leaves as a kid because I sure do?  I will have to give a link for directions because I have to admit that I had a bit to a FAIL on this one, though we did have fun.  For some reason, our wax paper placemats would not completely seal for me (I ended up finishing with a glue stick) so I will not subject you to my directions. 


Start out by going on a fun leaf walk with your toddler and make sure to pick a variety of different colored and shaped leaves.  Then you get to decide what you will do with the leaves:  will you cut them out and hang them on the curtains or windows, make placemats like we did, or maybe make a little book of different leaves stapled together.  Either way I had my toddler and preschoolers arrange the leaves and then I whisked them away into my gated kitchen to keep everyone away from the hot iron.  My kids loved eating off of their special placemats at dinner all week.


Saturday, October 29, 2011

Enjoying Nature at Night with Children

Fifth Weekend Field Trip – Night-time Nature Walk

For each month that has a fifth Saturday I am planning to make an out and about guide to help make your outings a little more fun and science focused.  This month’s outing is perfect for our fall season.  Darkness will arrive earlier and earlier, especially as we set our clocks back next week.  If your children are usually inside or in bed before dark, even your own familiar neighborhood can look quite exotic at night.   Before it gets too cold let’s get our little ones out there to enjoy the darkness without having to miss their bedtime.

Preparation
Choose a Location:  Your night time nature walk can take place at park open after dusk, a local forest, your neighborhood, or even your back yard.  Please be aware that this is also hunting season so you want to avoid any areas where hunters may be shooting.  Many parks that host educational programs will also run night walks.  Be sure to check the age ranges for the program.

Wear:   
         Long Pants to protect legs from any brambles, bumps, 
         and trips.
        Warm clothing – the temperature can drop pretty quickly.
        Sturdy Covered Toe Shoes – it’s very easy to trip in the  
        dark and  covered shoes will keep you much safer.
        Light-Colored or Reflective Clothing if you will be walking  
        near a road.  Reflective belts might be a good    
        investment  if you plan to walk often.

Bug Spray if you live somewhere where insects are still a problem.

Flashlights - Ideally you would use lights with a red filter helps to maintain your night vision.  You can use red plasticrap or tissue paper attached with a rubber band as a filter.  A headlamp would also be much easier to use so that you could keep your hands free for guiding little ones.  Children will likely want to carry their own flashlights as well.

Things to See/Questions to Ask
Feel the Grass – Is it wet or dry?  Has it rained?  Where did the Water come from? Very often in the fall the temperature can fall so rapidly that they grass may be wet with dew.

Look at the leaves on trees – some trees will fold their leaves at night.

Close your eyes – What sounds can you hear that you might not notice at other times?  You will probably hear insect noises and quieter sounds like the wind through the trees, maybe even owl hoots, but you will be unlikely to hear bird calls as you would during the day.
Can you find the moon?  What shape is it tonight? How many stars do you see? 

Look for Eye-shine.  Pets and animals with good night vision have eyes that reflect the light.  You may see the bright shine from cats or other animals as you walk.  In addition you can look for the eyeshine of spiders as a great way of finding them.  To do this, find a grassy area near hedges or some woods. Hold a flashlight on the side of your head, next to your eye. Shine the flashlight on the ground and look for tiny sparkles of blue or green light. Move closer to the light and you should find a small ground dwelling spider.  Wolf spiders are common. See how many spiders you can spot.  Flashlights can also be very helpful for finding spider webs and certainly make them more visible to children than they would be during the day.

Cross Paths with Critters – At night when all is quiet is when animals in urban areas start to move around.  Even in the city there is plenty of nature to be found when the world is quiet.  Do not be surprised if a Deer, Fox, Turtle, Crayfish, Rodent, or other animal crosses your path (I only named a few).  Remember that to see animals the whole party must move as quiet as possible.
Look for Bats.  If you find one explain how bats are not like birds at all, but that they are more like mice with wings.  If you have the time and energy, a round of Marco Polo on a grassy area is a great way to introduce how bats move by echolocation.

Lay down and Look at the Stars – Take a towel or picnic blanket and lay down for a look at what is above us.  As your kids to tell you what to see or just take in the beauty.
Pretend to be an Owl – Have your children pretend to be an owl.  Where do they think they would find food?  What trees look like good places to land?

Tips from the Expert
Keep the walks short at first- preschoolers may only be interested in a 15-30 minute walk.
Do not turn on the flashlights until you absolutely have to as it will destroy your night vision.

You may want to take a few familiar objects to touch or smell.  Have your children close their eyes and see if they can still identify them.  This is a great way to show then that even though we do not have great night vision, our other senses work just as well outside.
If snakes, scorpions, or other animals that you may disturb live in your area, be careful where you walk and be extra careful to wear protective footwear.

Thank you to my friend, Becky Clark, Naturalist at Pennyrile State Forest Park in Kentucky for being my guest expert.  Becky designs and runs nature programs for families and groups visiting the park.  You can see what is going on at Pennyrile on her blog http://www.kspappdev.com/blogs/pennyrile-forest/index.php?blog=true

A Few Words on Fear of the Dark

One thing that we definitely do not want to do is scare our children.  You may want to talk to your kids about the wonderful things that they can see outside after dark.  If they are afraid you may want to wait until they are not resistant.  Also once you are outside, make sure to notice how your child is doing and honor their feelings.  Making them stay in the dark when they are afraid is more likely to increase the fear than to help it go away.   

Extension:  Sweeten the deal by attracting some insects to study.

MOTH SUGARING

Supplies needed:

1. 1 almost overripe banana

2. Bowl

3. Spoon

4. 2oz. of apple cider vinegar

5. ½ lb. brown sugar

6. Plastic wrap

7. Small bucket

8. Wide paintbrush

Directions:

1. Peel banana and mash in bowl until pasty.

2. Add vinegar and brown sugar to banana. Mixture should be as thick as latex paint. If it is too thin, add more banana.

3. Cover bowl with plastic wrap and store in warm place indoors overnight.

4. Find an open space with several large trees.

5. Just before sunset, pour mixture into a bucket and use a paintbrush to apply a thick coat of the mixture onto the bark of 3 trees.

6. A few hours after dark, check the trees for moths. Use a flashlight covered with red plastic wrap or red tissue paper. Observe moths and other insects that are eating the mixture.

.

Activities from Night Science for Kids: Exploring the World After Dark by Terry Krautwurst.

Please add your favorite things to find at night this time or year and list your location in the comments area.

Thank you to Becky Clark and Mary Smith for your advice in writing this guide. 
Owl, Bat, Moth and Moon Images by http://www.public-domain-image.com.